Autumn Leaves are Falling
Autumn leaves have begun to turn the fabulous fire colors of autumn. If you are lucky enough to have the trees nearby, you know just what I am talking about. If not, best go for a drive to the woods. You certainly do not want to miss out. Sunday, David and I had the opportunity to head east to Redmond, Oregon. Driving over the pass on Mt. Hood was a visual feast. The sun was shining and the trees were ablaze. Wow! I do love the autumn season.
STEP ONE:
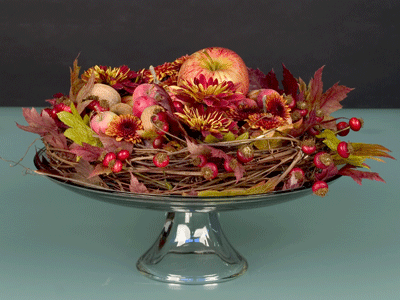
Beautiful fall leaves are the main event in this autumn centerpiece. Other odds and ends you will need are: a grape vine wreath, rose hips, apples, nuts, and a few autumn chrysanthemums. To show off the finished design, a pedestal cake plate is perfect. If you do not have one, a large dinner plate could work as well.
STEP TWO:
You will need 2-3 dozen assorted leaves for this project. My favorite are from the sweet gum tree. Lace leaf maple is gorgeous and vine maple or oak can work as well. Just pick your favorite colors and shapes.
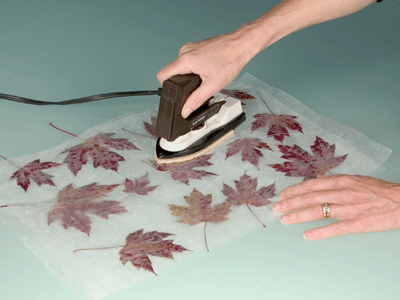
To keep the leaves from shriveling and becoming brittle, iron them between two sheets of wax paper. Once treated with this coating, they will last for years – without losing their color or their shape.
Put newspapers or cardboard down first to protect your work surface, then a sheet of wax paper. Arrange the leaves on the paper without overlapping. Top with another sheet of wax paper creating a leaf sandwich. Using an iron set on low, heat the sheets until they become transparent and bond together.
Hint: Yes, the wax will go on your iron. If you want to protect your iron’s surface, put a bit of paper between the waxed sheets and your iron. Of course, I don’t iron anything but leaves so I don't worry about it!
STEP THREE:
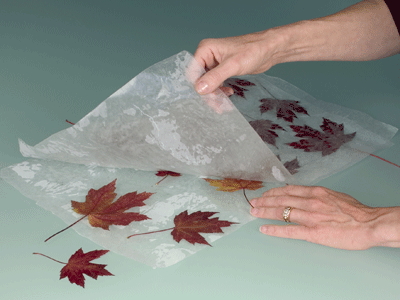
When the sheets have cooled, carefully pull them apart and peel off the leaves. If you want to store them for later, just leave them in the wax paper and stack them up. You can store them this way for a year.
So, yes, when you find the perfect leaves, stockpile them so they are ready when you want them.
STEP FOUR:
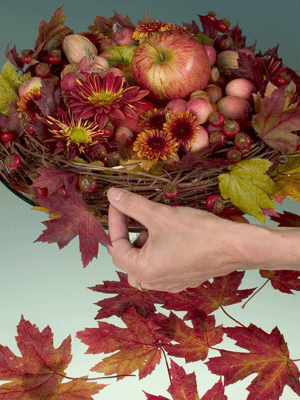
Set the grapevine wreath on the cake plate and begin tucking the leaves into the weave of the wreath. There is no need to glue them. They stay quite well just tucked into the weave. If you want to transport or ship this wreath to a friend, you can use hot glue for greater stability.
For interesting texture and color contrast, add bits of rose hips or other dried materials. If you love leaves like me – try it with just a bounty of foliage. It is truly lovely.
In the center, mound apples, nuts, or any other treasures you like. The flowers are placed in water tubes and just tucked into place. I know, all my preaching of mechanics, stability, and stem insertion go out the window with this project. I call it the “pile” technique. Just pile it in until you love it!
STEP FIVE:
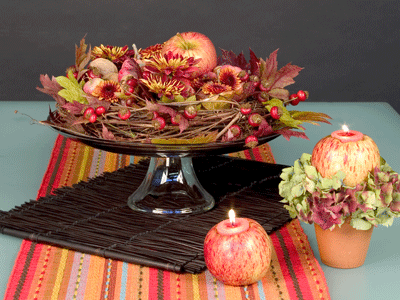
Add a festive autumn table covering and matching components and you have a wonderful beginning to autumn decorating for your home.
The components are equally as easy. Carve out the center of two apples and place a votive candle in the hole. One can sit directly on the table and one can sit upon a clay pot. For added fun, tuck a bit of hydrangea around the sides. Yes, quick, easy and autumn… What could be better?
Now, get outside. You need to be gathering autumn leaves. You have spent enough time at this computer. Have fun as you gather the bounty of the season.
Thank you for sharing this lovely and rustic centerpiece filled with the treasures of autumn. If you would like to lean more, join us in the Classroom or Online and study the theories and techniques of design with the Floral Design Institute Instructors.


